Flow Design
What is a Flow?
Flows provide a configurable message processing pipeline for integrating your data into the Energyworx platform, where data can be transferred forward into other systems. This process involves channelling a vast amount of data through a "funnel," progressively filtering and narrowing down the data at each stage until the desired, relevant information is obtained.
Each flow design consists of at least one flow design sequence, which can have one or more rules assigned to it.
The next layer to add to your design flow consists of the rules. And again, you can add more than one rule to each sequence. The rules narrow down your scope even further, allowing you to zoom in on a specific topic. This is specifically designed for business development purposes. This way we can see that:
- Flow Designs are comprised of 1 or more sequences
- A sequence has one or more rules
- Rules in the next Sequence(s) may use the results of the preceding Sequence. For example, values which are annotated by Validation Rules in Sequence 1 can be corrected by one or more Estimation Rules in Sequence 2
Once you’ve set up various Flow Designs, the Flow Design overview looks similar to the following example.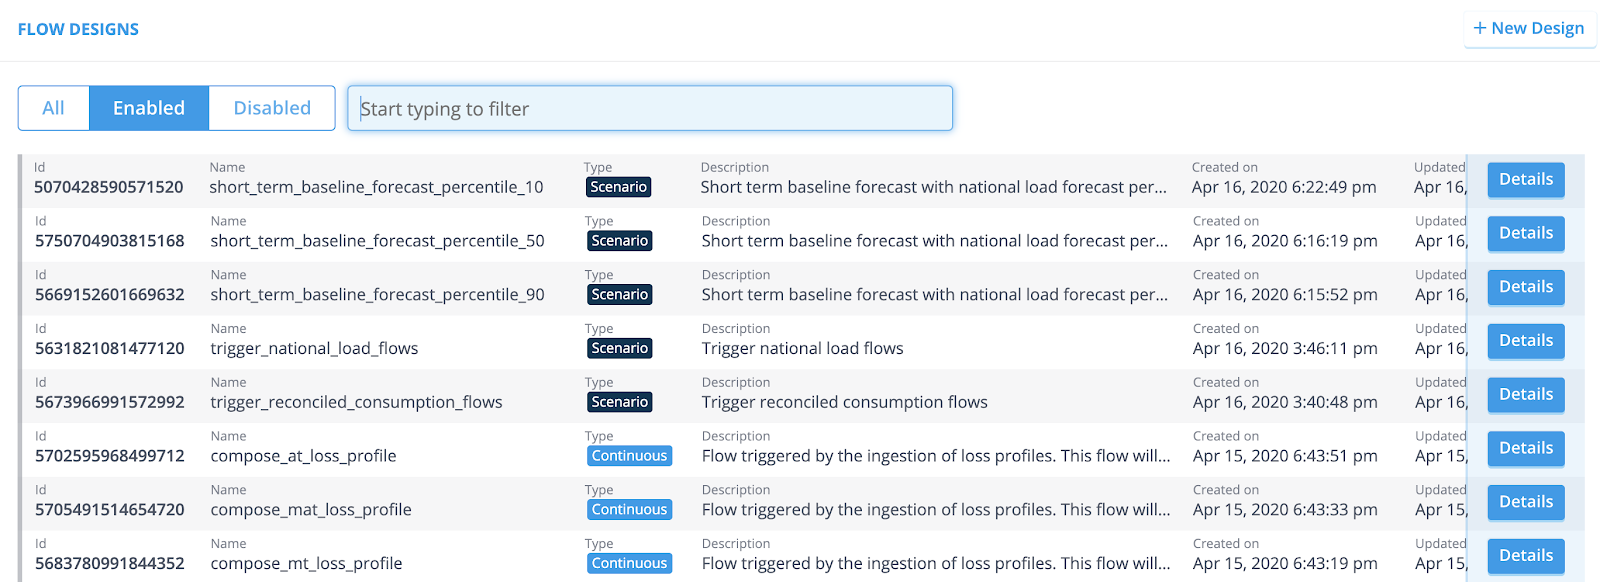
The Flow can be built by a chain of one or more flow designs, and interact with components explained in the following sections.
This image shows the ability to manage sequences and rules within a flow:
Flow Components
Datasources
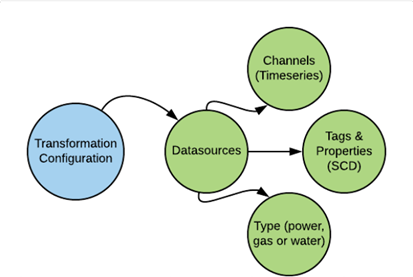
One of our key components, in enabling you to get more out of your valuable data, is the concept of Datasources. We categorise parts of your data as Datasources, which can then be used for further analysis.
Datasources can be any type of meter or sensor, or market profile. Basically, any kind of device that stores valuable data, or a profile containing it. Within our platform, the datasources come with a specific name and a description.
Two types of features are part of your datasources:
1. Time/series data, by Channels [Note: The Channels are frequently used, but not mandatory. They are assigned automatically by the Transformation Configuration and can not be altered afterwards.]
2. Slowly Changing Dimensions, by tags and properties [Note: Tags and properties can be assigned automatically by the Transformation Configuration. They are optional, and can be maintained in the console.]
Slowly Changing Dimensions come with both a version date and a valid from date. See the following example:

Non Slowly Changing Dimensions do come with a version date, but without a valid from date. Think of unique identification codes, product specifications etc.
Next to these features that are added to your Datasource, our platform also assigns Classifiers and a Datasource type. A Classifier consists of a name and a description, and the datasource type is set to either ‘power’, ‘water’, or ‘gas’.
See Datasource Classifiers for more information.
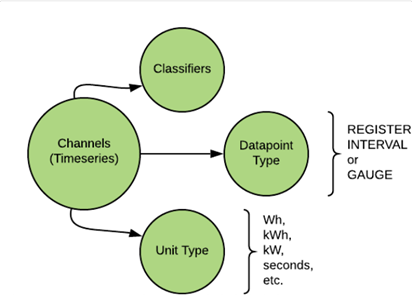
Channels
The channels take care of your time/series data, and it’possible to have multiple channels set up for each datasource. A perfect example would be a meter that measures the usage during the day and during the night. It delivers two sets of timeseries values, and therefore would consist of two channels. The channels themselves have a name and description, and consist of various classifiers. Among the classifiers are ‘Unit type’ and `Datapoint type’. Once again, these classifiers a reconfigured automatically and can not be edited. ‘Unit types’ can be defined as kW, kWh or ‘seconds’. And ‘Datapoint types’ can be defined as ‘REGISTER’, ‘INTERVAL’, or ‘GAUGE’. REGISTER displays a cumulative value, and always increases. INTERVAL displays a unit measured over time, for instance kWh. A GAUGE displays a unit measured at a specific moment. It can increase or decrease, compared to previous points in time.
See Channel Classfifiers for more information.
Tags and Properties
The tags and properties can be categorised as metadata, and specifically take care of your ‘Slow Changing Dimensions’. A perfect example would be validity date or a version number. This is particularly helpful when your customers switch energy retailer. The meter that’s installed in their home obviously doesn’t change, but it is valuable to keep track of who their retailer is.
The tags and properties enable you to easily keep track of these changes, in a way that doesn’t corrupt your data. In the case of people switching energy retailer, you can add a validity date to your tags, which indicates when the change took place.
Types of flows
There are two independent dimensions to configure the behavior of a flow design:
- Flow type: Scenario/Continuous flows
- Flow scope: Channel/Datasource flows
These flavors can help you to model how to visualized the data that is processed through the flow design.
Scenario/Continuous type
This option determines how the timeseries of the channels processed within the flow design are visualized with respect to the versions.
NOTE: It is not advisable to change the selected type in this flavor once the implemented solution has been deployed. This can result in unexpected behavior in console visualization because the flow metadata stored on each flow contains the type of flow.
Scenario Flow
A Scenario type flow generates new results every time the flow runs, per time unit.
This means that each run is treated as an independent scenario, producing a fresh set of results for the specified time unit, without necessarily considering previously generated results for the same period. If you are creating forecasts, where each forecast has it's own parameters/settings, you would choose scenario. It will not show multiple scenario results together in a chart or table.
Continuous Flow
A Continuous type flow updates or adds a result every time it runs, meaning historical data is taken into account.
This implies that a continuous flow builds upon existing data. If a flow runs again for a period for which data already exists, it will update or add to that existing data, rather than generating entirely new, independent results. This is particularly useful for processes where results are incrementally built or refined over time.
In essence, a Scenario flow is like running a fresh calculation for a specific period each time, while a Continuous flow is designed to maintain and evolve a dataset, incorporating historical context with each run.
Channel/Datasource scope
This option determines how the channels of the datasource origin are processed and configured throughout the flow design.
You can chose the flow scope in the following buttons in the Flow Design creation page:
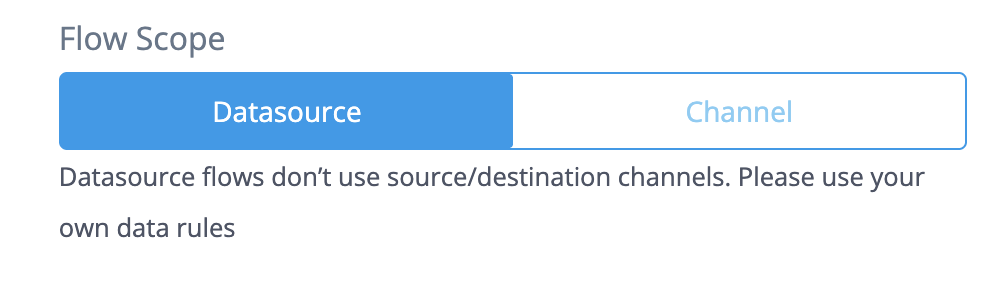
Datasource flows
Datasource flows are one of the flavors that a user can choose to execute a flow. Datasource flows offer the flexibility of providing all channels from a datasource as input data, simplifying the configuration of the flow and its contained rules implementation. This is the advised option to configure a flow as Channel flows are more limited.
Datasource flows are different than Channel flows and they are not interchangeable, but they can be compatible to some extent, see below in Compatibility.
NOTE: Please note that when working with datasource flows, returning a dataframe with annotations does not create a task.
Behaviour and configuration
A Datasource flow will provide all the channels ingested by default so that they can be used in the rules. All the channels will be available in the self.dataframe attribute of the rule implementation.
Datasource flows may be composed by one or multiple sequences. Sequences are lists of rules that are executed in sequence. This offers the possibility to put together a set of rules that are executed with a common purpose under the same sequence.
Chaining Flows
The expected behaviour for data passing in datasource flow is that data in self.dataframe won’t be passed to the chained flow, unlike channel flows which pass the data of the destination channel into the chained flow’s source channel.
User can configure a Transformation Configuration (TC) to execute Datasource flows in this panel in the TC:
NOTE: a source and destination channel is shown for every sequence in the flow but this must be left empty for datasource flows.
Other combinations A datasource flow can be scenario or continuous flow, the behavior and the results will be the same as described in Continuous and Scenario Flows
A datasource flow can be chained to and from other flows (channel or datasource).
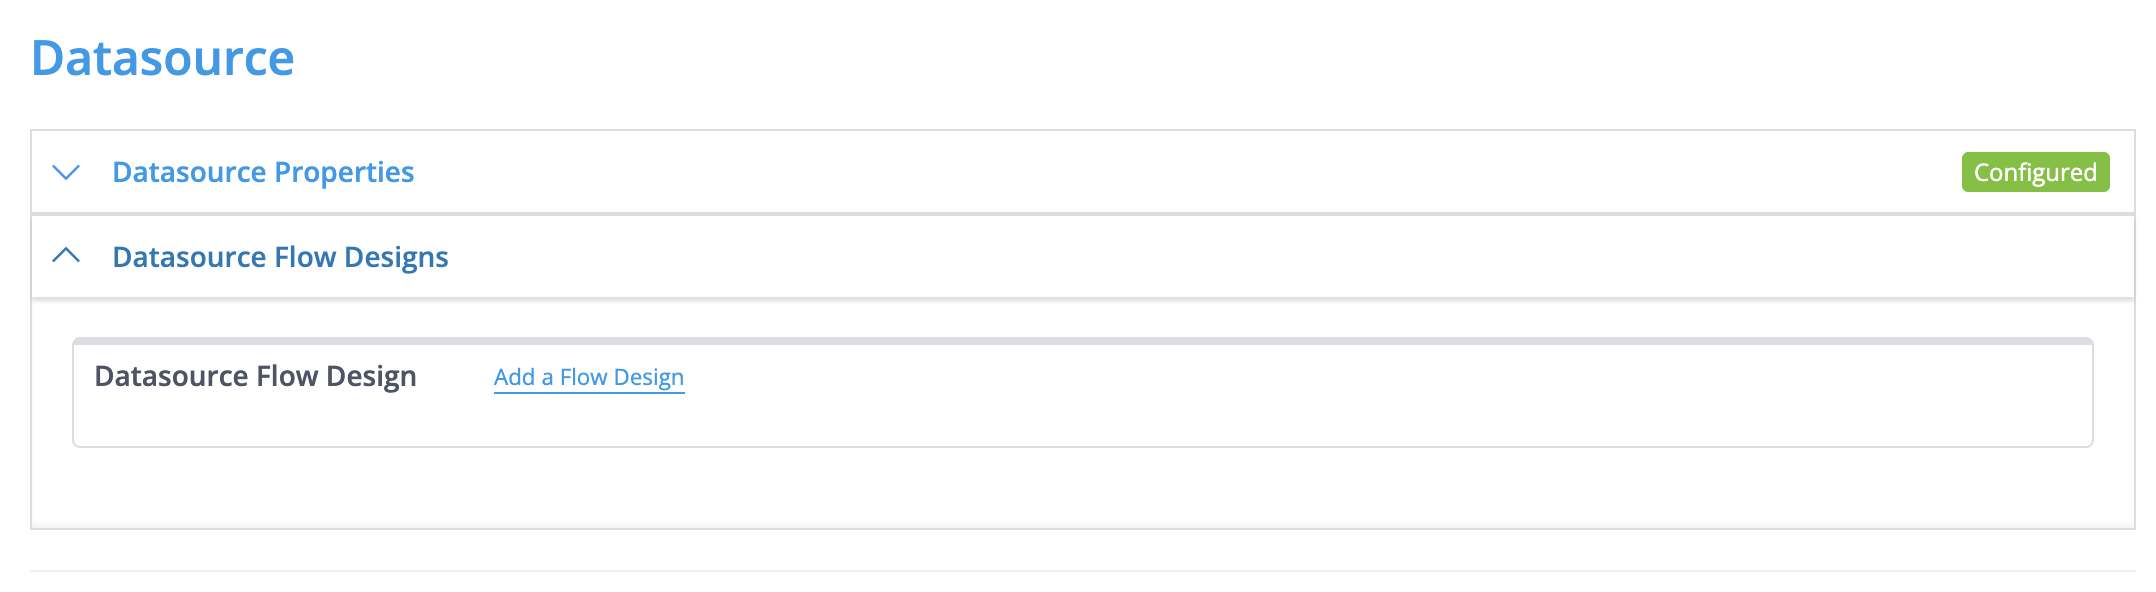
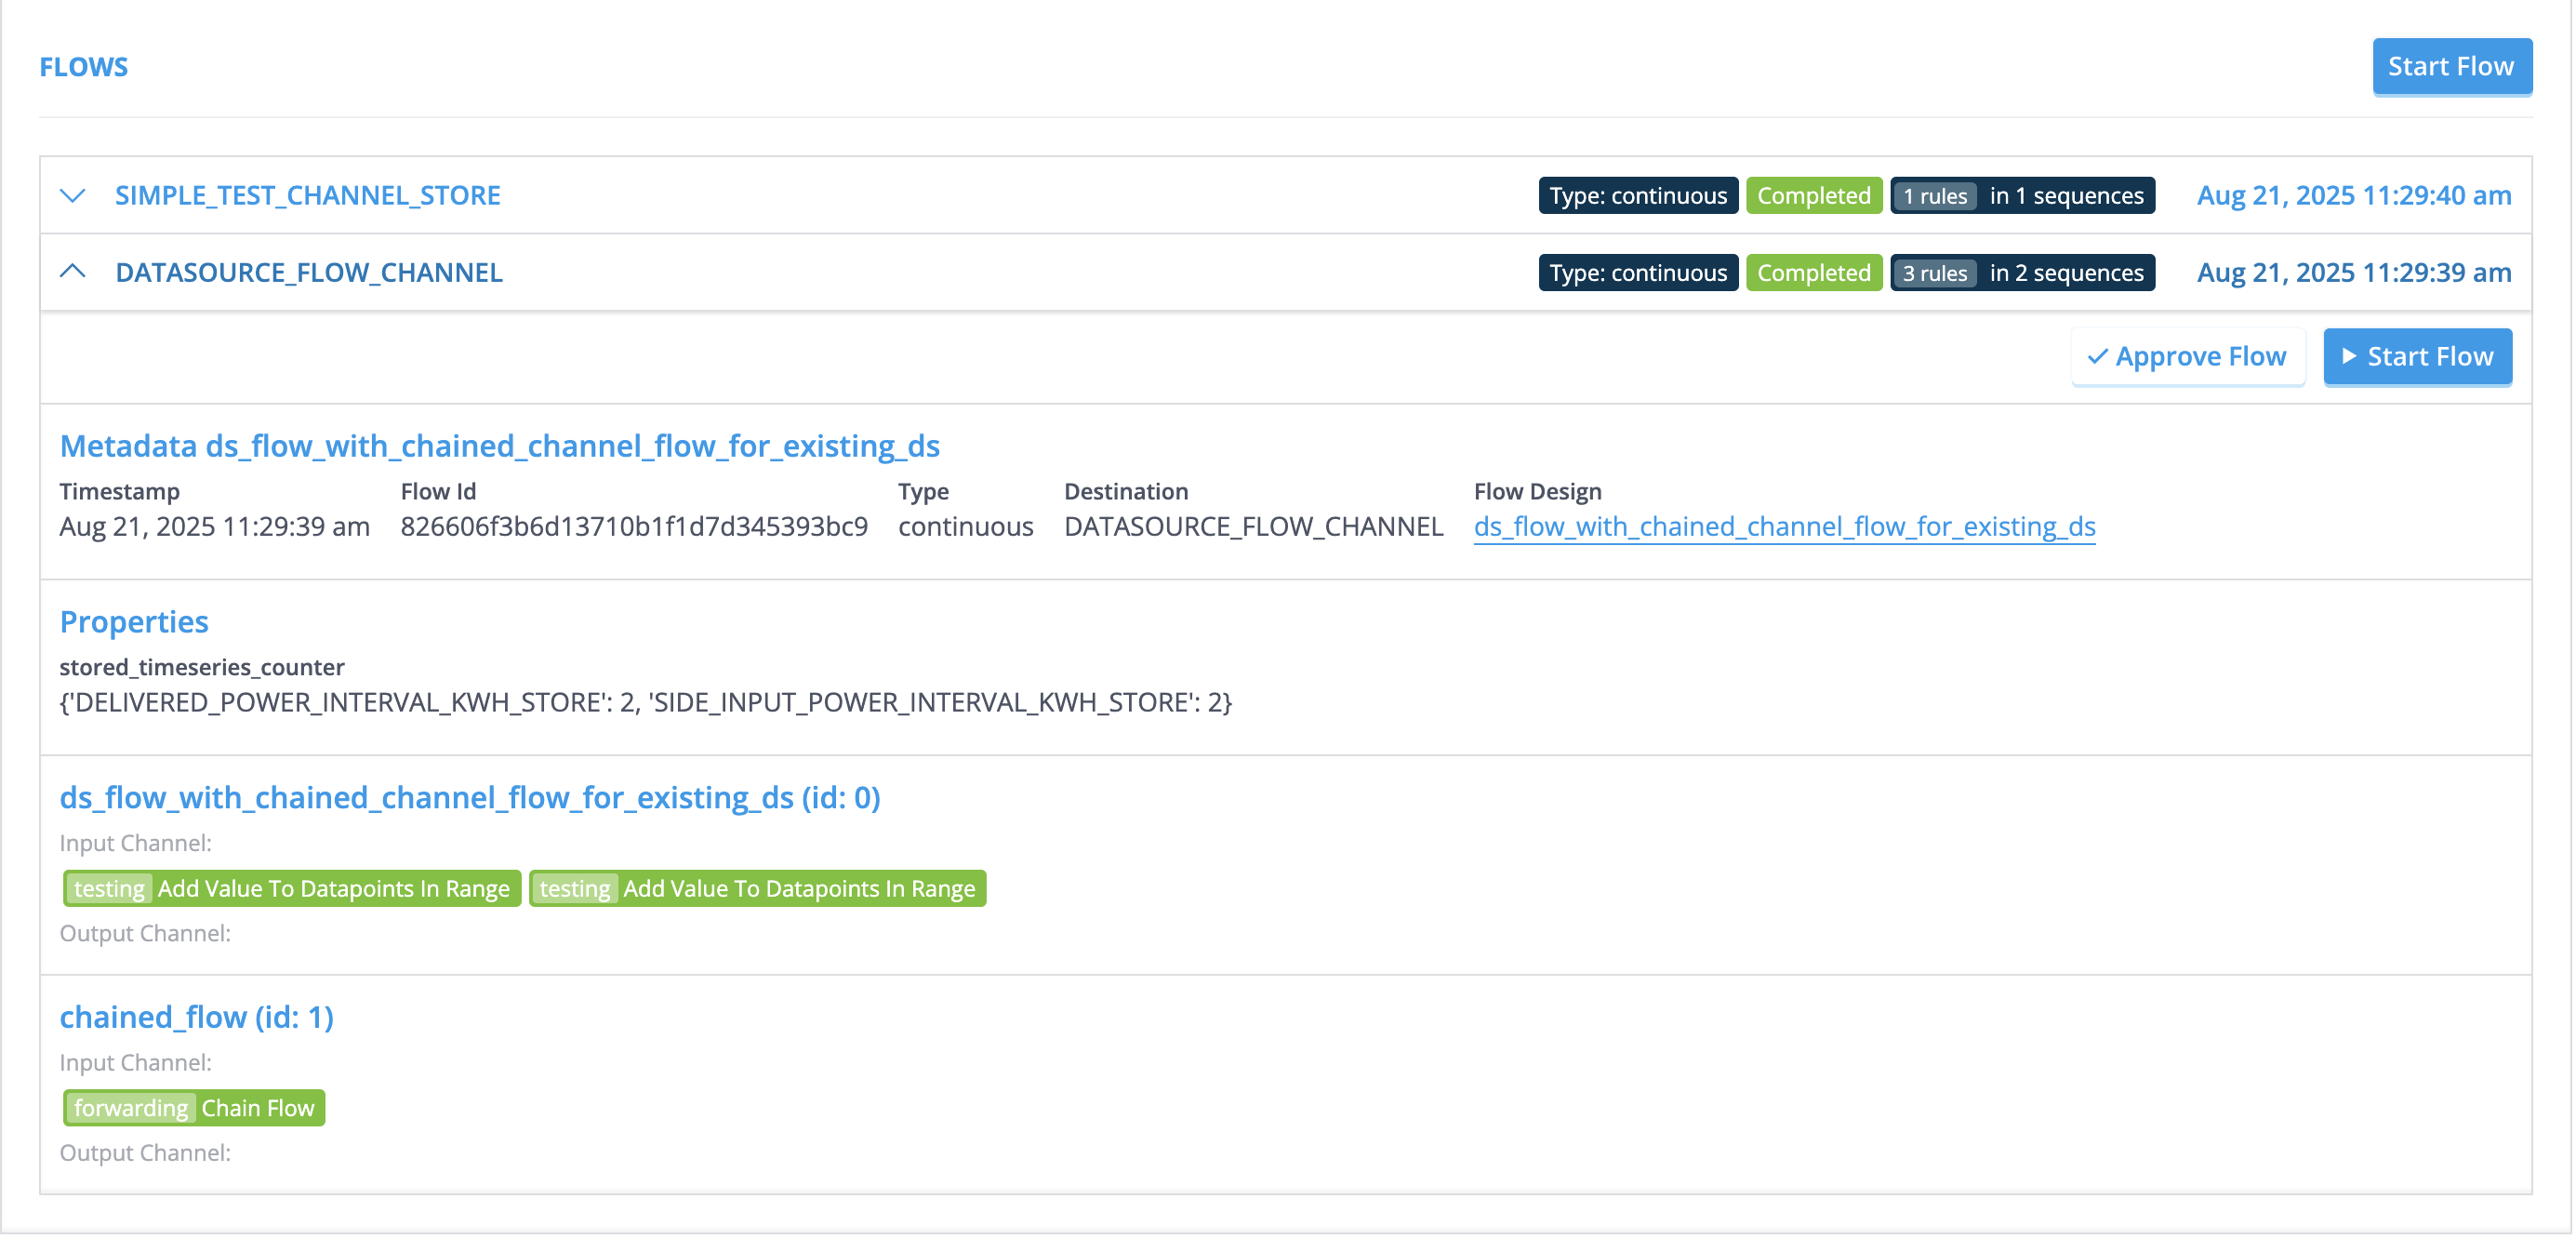
Result visualization
The results of datasource flows can be visualized in the flow section of the datasource. The results will be always under the channel DATASOURCE_FLOW_CHANNEL as shown in the picture:
Compatibility Datasource flows configuration is different than a channel flows configuration, thus they are not fully compatible. However, there are tools that can help in providing the conversion from a channel flow configuration to a datasource flow configuration.
The rules used in a datasource flow must not make use of the source_column, destination_column, source_channel and source_channel_classifier.
Annotations created from rules and stored with the store rule are not compatible with the datasource flows. For storing annotations the function in the rule framework store_annotations should be used.
Channel flows
Channel flows are less flexible than Datasource Flows but for compatibility reasons we explain here how they work.
The main difference with respect to datasource flows is that the sequences themselves are all set up by defining a Source Channel and a Destination Channel. When you create a flow design that consists of multiple sequences, be aware that the source channel of a sequence is equal to the destination channel of the previous sequence.
How to create a Flow design in the console

Take the following steps to create a new Flow Design:
Go to [Flow Management → Flow Design] and click the [New Design] button.
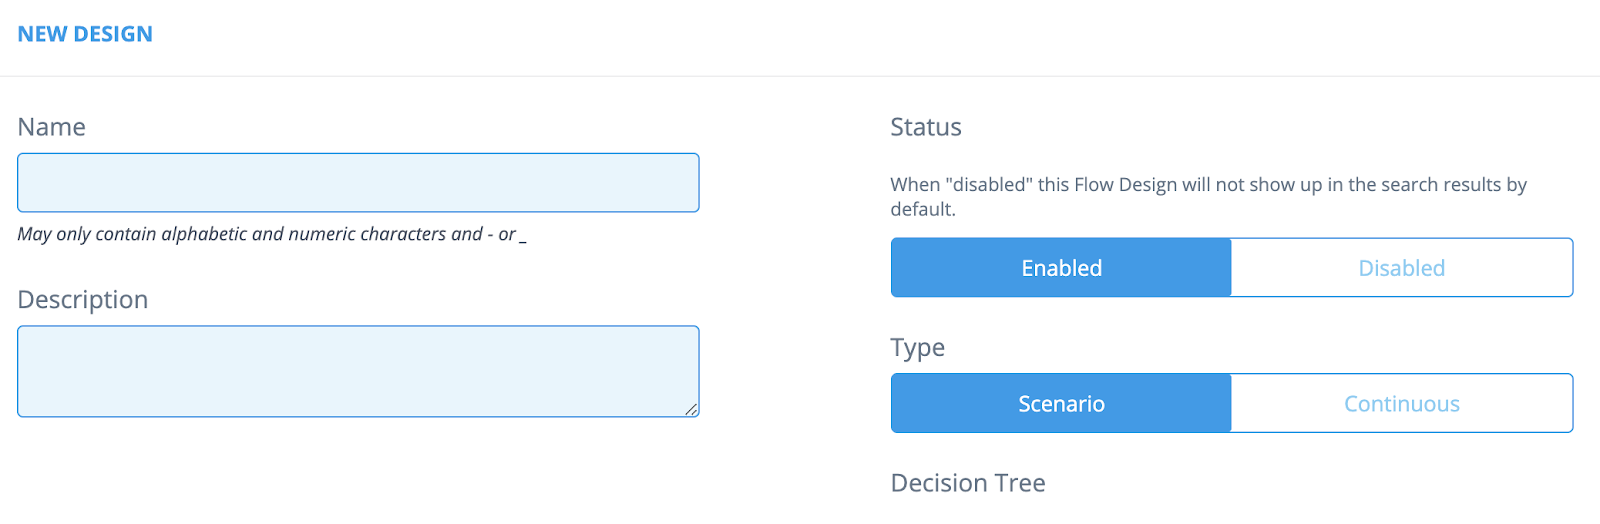
Fill in the [Name] and [Description] fields.
Select the Status: Enabled or Disabled. If Disabled, the flow won't be visible in the flow list.
If Select the Source Channel by clicking the [Set initial Source Channel] hyperlink.
Select the Destination Channel by clicking [Change Destination Channel] hyperlink.
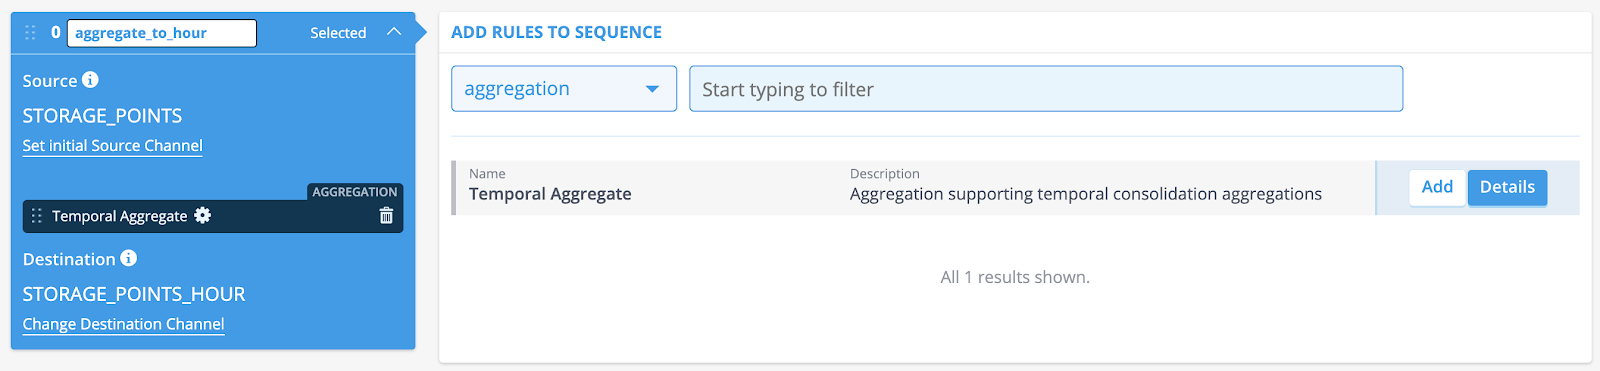
Add one or more rules to the sequence. Narrow down your search by using the drop-down menu or the search field.
Adding rules
Take the following steps in order to assign rules to your flow design:
- Go to [Flow Management -> Flow Design].
- Click the [Details] button of the Flow Design you want to assign rules to.
- Click [Select] on the sequence where you want to assign rules.
- Rule parameters can be adjusted by clicking the gear icon.
- Select the type of rule you want to assign by using the dropdown menu (for instance, aggregation, validation, forecasting).
[Note: You can add multiple rules to one sequence.]
- Click [Add] on the rules you want to be part of the flow.
- Optional: You can name your sequences. By default, the sequences are named ‘Sequence’ but you can easily change this into what’s useful. In a later stage, this can prove to be very helpful in regard to debugging and documentation purposes.
- Click [Save] (at the top of the screen) when you’re done.
In the next article you can learn how to configure Rule Configurations
How to run a flow
These steps describe how you can start a flow. The most common way is to rely on the automations provided by our platform is designed. To run a flow design automatically, once the data has been ingested, can be done by assigning a flow design to a transformation configuration.
- Go to [Smart Integration → Transformation Configurations].
- Click the Details button of the Configuration you want to edit.
- Scroll down to the Channels section and open the Channel.
- Fill in the ‘Assign a Flow Design’ field, or search for one by clicking the ‘Find a Flow Design’ hyperlink.
There are multiple ways to start a flow manually.
Starting a flow for multiple datasources
- Go to [Search → Search Datasources]
- Search for the Datasource(s) you want to run a flow on.
- Select the checkbox on the left side of the results overview, and more buttons will appear on top.
- Simply click [Start flow(s) for selection] and the flow will run.
Starting a flow for datasource details
- Go to the datasource [Search Datasources → Datasource Details]
- Scroll to “Flow History” and click the button “Run Flow”
- Select the flow, and click run
Starting a flow from the flow design configuration
- Go to the Flow Design Page
- Select the flow you're interested in
- A page to search for the datasource will appear
- Select a datasource and click start flow
Chained flows
Introduction
The sections above explain how to create a standalone flow. However, it is also possible for a flow to chain to another flow. This has multiple use cases, for example:
- You want to keep a child-flow as general as possible, calling it with specific parameters.
- You have a child-flow you want to run from multiple parent-flows.
- You have a flow you sometimes want to run, and sometimes don't want to run, depending on a parameter set in another (parent-)flow.
Create a chained flow
Here is how you can setup a chained flow. First, create a child flow:
In the example above, you see a flow called child_flow. There are no differences between a normal flow and a chained flow. All flows can be used as either standalone or chained.
Next, setup a parent flow. You can choose either A) a chain flow rule, B) a conditional chain flow rule, or C) a collective trigger pipeline . There are two main differences between the chain flow rule and the conditional chain flow rule:
- The conditional chain flow has more parameters which can be set than the chain flow.
- The conditional chain flow checks if the rule should run, based on a flow property.
Chain options
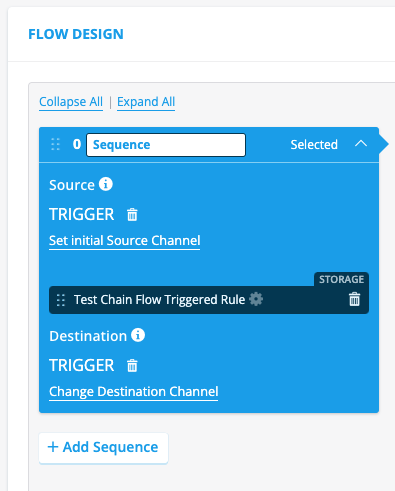
Option A: Create a parent flow with a chain flow rule.
In the example above, you see a flow called parent_flow. This flow runs first a validation rule, and next a chain flow rule. The chain flow rule has the following parameters to set:
Classifier : Select which channel classifier the rule should use during execution. This should be set to the source channel of the child flow, if it's a channel flow child.
Flow Configuration : Select which flow configurations which should be triggered by this rule. This should be set to the unique ID of the child flow.
With these settings, when you start the parent flow, the child flow will be started directly after.
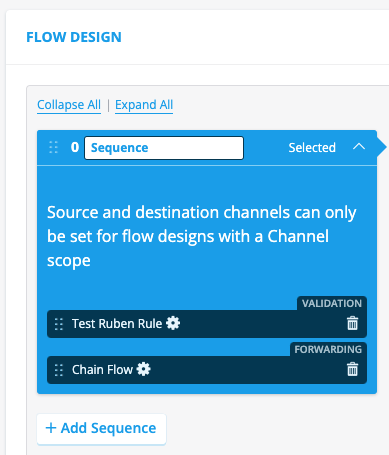
Option B: Create a parent flow with a conditional chain flow rule.
The conditional chain flow rule is almost the same as the chain flow rule, but it has the following parameters to set:
Channel Classifier : Select which channel classifier the rule should use during execution. This should be set to the source channel of the child flow.
Flow configuration ids : Select one or more flow configurations which should be triggered by this rule. This should be set to the unique ID of the child flow.
Decision Tree Id : The decision tree which needs to be executed upon triggering a flow to determine which flow needs to be executed. See Decision Trees for more details on how to create and configure decision trees.
Start on flow data : If set to False it will load data from the source channel and not data from the current flow.
Start Delay : The amount of seconds before the chaining should happen.
Prepare SCD timeline for Virtual Datasources : This will prepare the SCD timeline in case the datasource is a Virtual Datasource.
Pass tag context : Pass the tag context of the calling flow. Reloads tags when called flow runs. In most use-cases, passing the flow context is desired (value: true) due to race-conditions on the tags storage.
The validation rule has code which sets a flow property called ‘skip_chain_flow’. If set to True, the chained flow will not be triggered. If set to False, the chained flow will be triggered. This parameter can be set as such:
self.flow_properties['skip_chain_flow'] = False
It's advised to set the parameter to True at the start of the rule, and only set it to False if you want to trigger the child flow, as such:
    self.flow_properties['skip_chain_flow'] = True
    <rest of rule code>
    if check_parameter == check_value:
        self.flow_properties['skip_chain_flow'] = False
Option C: collective trigger.
The previous options are mostly used for either chaining from one flow to another on the same hierarchy level, or from a higher to a lower hierarchy level to a lower level. However, if you want to chain from a lower hierarchy level to a higher hierarchy level, you can use the collective trigger function. For example, let's say you have 1.000 meters, and only when all are done with their flow, do you want to start an aggregation flow to a higher level. You can use the collective trigger function for this. The moment the count of the collective trigger with the same correlation id as the expected number of messages is reached, the flow configuration will be triggered.
Read the possible parameters here.
Example python code for calling the collective trigger on each of the 1.000 flows:
self.send_collective_trigger(
            correlation_id=self.context['correlation_id'],
            datasource_id=self.context['contract_ds_id'],
            expected_number_of_messages=self.context['number_of_meters'],
            deadline=None,
            deadline_delta=60 * 10,
            timeout_between_messages=None,
            late_data_behaviour='discard',
            source_channel_id=None,
            flow_config_id=int(123),
            flow_properties=self.flow_properties
        )
Extra information
You can pass information from a parent-flow to a child-flow via flow_properties.
flow_properties usage
flow_properties is a dict available on every rule via self.flow_properties. It can be read and written by any rule in the flow and is automatically passed to any chained flow. This makes it the primary mechanism for sharing non-timeseries data between rules and between chained flows.
Supported types
Only basic, JSON-serialisable data types can be stored in flow_properties:
| Type | Example |
|---|---|
| String | "estimated" |
| Number (int or float) | 42, 3.14 |
| List | [1, 2, 3] |
| Dict | {"key": "value"} |
| Boolean | True, False |
None | None |
Unsupported types
Storing complex Python objects — such as pd.Series, pd.DataFrame, custom class instances, or any non-JSON-serialisable type — will cause serialization errors when the flow chains to another flow. These types may appear to work within a single flow but will fail at the chaining boundary.
If you need to pass timeseries data to a chained flow, convert it to a plain list or dict first:
# Store as a list (supported)
self.flow_properties['my_values'] = self.dataframe['MY_CHANNEL'].tolist()

# NOT supported — will fail when chaining
self.flow_properties['my_series'] = self.dataframe['MY_CHANNEL']
Adding custom data
Any key name can be used in flow_properties, as long as the value is one of the supported types:
# In a parent flow rule
self.flow_properties['correction_factor'] = 1.05
self.flow_properties['active_contract_ids'] = ["ds-001", "ds-002"]
self.flow_properties['metadata'] = {"source": "manual", "version": 2}
The child flow can then read these values:
# In a child flow rule
factor = self.flow_properties.get('correction_factor', 1.0)
contracts = self.flow_properties.get('active_contract_ids', [])
Reserved keys
The key skip_chain_flow is reserved and used by the conditional chain flow rule to decide whether a chained flow should be triggered (see Option B above).
Warning: Chained flow can be triggered before data is written from parent-flow
Let's assume your parent flow writes a tag, timeseries data, audit events, etc. You child flow reads this data, and uses it. This is possibly a problem: Because of the parallel processes running in the backend, it can and will happen that a chain flow is started before the data is written from the parent flow. A workaround for this is to write the data from the parent flow (also) to flow_properties, and read these in the child flow. Only when the flow_properties is empty in the child flow, would you read the real data.
For example parent flow:
    new_channel_data = pd.Series(index=self.dataframe.index, data=[1,2,3])
    self.flow_properties['new_channel_data'] = new_channel_data.tolist()
    return RuleResult(new_channel_data)
Example child flow:
    new_channel_data = self.flow_properties.get('new_channel_data')
    old_channel_data = self.dataframe['new_channel_data']
    if new_channel_data is None:
        use_channel_data = old_channel_data
    else:
        use_channel_data = pd.Series(new_channel_data, index=old_channel_data.index)